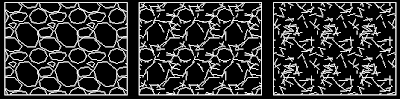
Issue: Your hatch is broken into segments. Below is an example of the Gravel pattern. The further your hatch objects are from 0,0 the worse it gets.
Solution:
1) Type "SNAPBASE"
2) Pick a point near your proposed hatch area.
3) If your hatch pattern exists all you have to do is type "HE" for "HatchEdit" and press OK. Double clicking a hatch object also opens the Edit Hatch dialog.
OR
3) Create a new hatch object.
IMPORTANT STEP!!! Reset snapbase back to defaults.
4) Type "SNAPBASE"
5) Type "0,0" (Return to Default)
Updated for AutoCAD 2008 on 12/16/08:
The above workaround doesn't always work.
So here's round 2:
- Create a hatch boundary polyline.
- Wblock, copy clip into a new blank drawing around 0,0,0.
- Hatch as usual.
- Wblock, copy clip into your original drawing around 0,0,0. Remember to include the hatch boundary in your selection. You'll need it to move your hatching into position.
- Finally move it into place.
If you have a faster work around please reply. I will copy your tip into the main post so people can get the answer and return to work.


21 comments:
Hmm. I'm quite the CAD amateur but I'm doing some drawings, and have the problem with a busted gravel hatch pattern. I've tried to follow your steps but nothing is working... any advice?
Is your coordinates so far out in space that even this fix doesn't work? I wouldn't surprise me. AutoCAD has a history of issues regarding these large coordinate systems. We could discuss this further via email if you'd like.
mrieben@mve.net
this only works in 2006 or older in the new 2007 and 2008 you need to select he ans specify and new origin in he hatch box on the bottom left
You have just helped me solve a problem that was foxing serveral of opur CAD techs
One point for the Landscape Architects!
I forgot I had even posted here in the past, but stumbling on this problem again in a new job brings me back! And I was using 2008, and I think I solved it by moving the UCS origin. I am now using 2009 and know that moving the origin isn't the best, but Allen saved the day with his comment!
Why can't acad make a fix for this hatch anomaly? It's been occuring for years on every freaking cad produc!!! Urrrrrrrrrr!!!!!!!
This isn't relevant to this conversation but.. I hate it when ACAD keeps crashing year after year. WTF!? Why can't autodesk make a stable product?
In response to vanilla ice...
I believe this issue has to do with the floating precision in a 32bit environment. 64bit Vista is probably our answer to many anomalies like this. Large coordinate systems have been an issue since day one. Working with state plane coordinates is a chore at times. I personally can't wait till we migrate to a 64bit environment. IT is always hesitant to make a jump like that. I've read many people have no issues with software compatibility. Some are having issues with plotter drivers.
In regards to your irrelevant issue I have posted my 2 cents on December 12, 2008. Check it out and reply there.
Thanks for reading!
hello, just fyi - this has been fixed for the civil3D subassembly hatches with version 2009. If you don't see it immediately, redefine your subasssembly with the gravel hatch pattern.
here's a quick way to fix it, in hatch origin found in hatch pop-up window, set it to "specified origin" instead of "current origin", then check-default boundary extents. cheers!
Also a quick fix:
Hatch the area in paper space then type in command change space to move it into model space (chspace). It works in any condition.
try this as well,set your variable measurment and work around the on and off and retachI tried this in 3occations seems the answer i need.
Richard Lim
The problem arises not from whether the opsys is 32bit or 64bit but with the precision with which the pattern is specified in the hatch pattern definition file. More here:
http://www.hatchkit.com.au/faq_detail.php?id=2
This has been driving us crazy for years! Thank you
Thank you!!! I forgot about the hatch origin.... : )
I use autocad 2010 so I moved the ucs close the hatch area.It work fine
I suppose very likely it's dwg file corruption
I should suggest you following utility DWG Repair Toolbox program help you
Hi,
I'm from Brazil, and you've just helped me veru easily.
Thank you
Hi there from "Down Under", Your tips on hatching helped me out. I had to create the hatch in a new dwg and import into my dwg at 0,0. then move my data to the new location. All good! Thanks again, Paul
You don't have to create new dwg. Just move everything closer to 0,0.
hello there.. just right click and select 'set origin', then click at any point inside your bursted hatch pattern. (cad 2012)
I found moving the detail drawing with the broken har=tch pattern to the 0,0 location on the drawing solved the broken hatch pattern. Thanks.
B Newman
Post a Comment