Issue: I'm getting a message asking me, "Do you really want to do this?"
I stumbled upon this many moons ago. This is one fix I know of. Doesn't always do the trick so give it a try and hope for the best.
The issue I found was my Associative Hatch was using an Xreference Object as my boundary.
I used the Pick Points function in the Boundary Hatch command to create my hatching. I started to see this message shortly thereafter and sometimes after I've closed and reopened my drawing.
Wednesday, December 12, 2007
My Attributes are Missing
Issue: My attribute text in my title block is not shown. My Layer is Thawed and On. What gives?
Your attributes may be turned off. To return to default use this command.
Command: ATTDISP
Enter attribute visibility setting [Normal/ON/OFF]: N
Normal is default. Invisible attributes are not shown whilst others are.
Many Land Desktop users change this to ON so the profile attributes appear. What they forget is that they should use Normal to change it back, not OFF.
Your attributes may be turned off. To return to default use this command.
Command: ATTDISP
Enter attribute visibility setting [Normal/ON/OFF]
Normal is default. Invisible attributes are not shown whilst others are.
Many Land Desktop users change this to ON so the profile attributes appear. What they forget is that they should use Normal to change it back, not OFF.
Thursday, October 25, 2007
My Underscores are Missing from my Menus
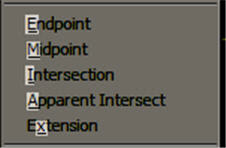
Issue: Your Menu Bar or Osnap Menu doesn't have underscores under key letters.
Windows 7: http://superuser.com/questions/16952/how-to-enable-underscore-shortcut-mnemonics-for-menu-items
This post goes hand in hand with my previous post called http://autocad-for-civils.blogspot.com/2007/10/how-to-speed-up-working-with-osnaps.html
Windows XP:
- Open the Control Panel
- Open Display
- Click Appearance Tab
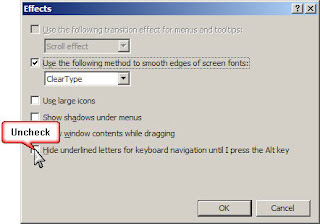
- Press the Effects... Button
- Uncheck "Hide underlined...."
- Press OK Button
The underscores should appear instantly.
Windows 7: http://superuser.com/questions/16952/how-to-enable-underscore-shortcut-mnemonics-for-menu-items
This post goes hand in hand with my previous post called http://autocad-for-civils.blogspot.com/2007/10/how-to-speed-up-working-with-osnaps.html
How to speed up working with OSnaps
What if I told you that when I work with Osnaps I never see the Osnap Menu? Ahh... Ooo... I don't mean use Toolbars. That would require screen real estate that I'm not willing to give up.
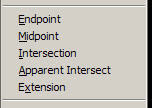
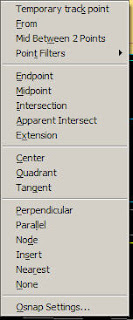
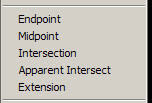
This menu can be accessed a few ways. (See Image -->)
- Middle Button down
- If your middle button is "Pan" then Shift+Right Click
(This function is controlled by the variable MBUTTONPAN)
Focus on the Underscore under Each Osnap.
Work flow...
- Draw a Line
- Bring up the Osnap Menu
(If you remember your Key Letter then just key it in. No menu clicking necessary.)
- Press E for Endpoint
Continue as usual.
If you don't see the underscores in this menu then see my next blog post to change a windows setting.
I hope this speeds you up. Happy Cading...
Wednesday, August 22, 2007
Thursday, July 26, 2007
Screen Capture for Documentation of Standards
Every day I seem to find myself creating tutorials or writing training material. I add screen shots in every document I write. Users will become accustom to it quickly. Let's be honest, it's tough enough to get people to read the simplest of emails.
My Old Method of Screen Capturing:
I used to use PrintScreen button and paste into MS Paint to make edits. Capturing Menus required capturing the entire desktop. If you used Alt+PrtScn to capture just the active program window the menu would disappear. I was sick and tired of cropping Menus so I did what every Good CAD Manager does and searched for a better cost effective solution.
I found SnagIT here: http://www.techsmith.com/
The price of $39.95 is unbelievable. (08/28/07)
It does Menus in a snap. Not only does SnagIT capture virtually anything on your screen in hundreds of methods it also comes with an Excellent Editor. I seem to learn more and more each day I use it. Techsmith created a video series called "SnagIT 24 in 24" to help any user achieve their goal.
My ROI was accomplished on my 1st project. I had to update my CAD Standards. So I scrapped every screen shot and completed it using SnagIT.
They give you a 30 day trial period. If you do screen captures at all as apart of your job this tool is a must have. No I'm not getting kick backs from Techsmith. I just know a good product when I see it.
Wednesday, June 20, 2007
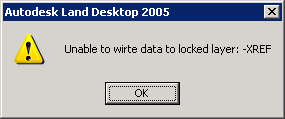
Error: Unable to write data to locked layer: ???
Do you get this error when opening a drawing file in Land Desktop?
Background Info:
A block named "ADCADD_ZZ" gets inserted by LDT into the 1st layout tab. This block includes information about the name of the project (database) that the drawing is attached to and the drawing setup information.
Solution:
Background Info:
A block named "ADCADD_ZZ" gets inserted by LDT into the 1st layout tab. This block includes information about the name of the project (database) that the drawing is attached to and the drawing setup information.
Solution:
- Change the "ADCADD_ZZ" block layer to Zero (0) and/or unlock it's layer.
- Since you can't select the object with a mouse you have to use something like Quick Select to grab it to change its layer.
Tuesday, June 19, 2007
AutoCAD Licensing Issue with LDT & Civil 3D
This post is more venting than knowledge passing. Sorry about that. Maybe you'll come across this prior to asking for new license files from your Autodesk Reseller. This is my story as I write this...
I contacted my Reseller for new license files for 2008 Land Desktop, Civil Design, Survey, Raster Design, & Civil 3D (C3D). I quickly learned Autodesk changed the packages from 2007 to 2008. They now give you the LDT package free and bundled with Civil 3D.
Here's my situation. I have 24 Civil 3D and 18 LDT licenses. Why, long story. Here I'm sitting with 2 icons on my desktop, C3D & LDT. The first 24 users who need LDT open AutoCAD using the C3D icon then access LDT through a Workspace. The next 18 have to use the LDT icon (normal procedure) or they will receive a lovely License Error. This is obviously a problem. I suppose I understand where Autodesk is coming from. If they give me 42 LDT licenses and 24 C3D licenses then I will actually be able to use 66 LDT instances. I'm forced to change my user's habits before we begin the great transformation to C3D.
Here's my solution. May not be the best, but it is one without confusing 42+ people.
- Configure both LDT & C3D installs with all customization the same regarding LDT.
- Choose 24 of my top power users and install only Civil 3D on their work stations. Maybe they'll start exploring and learn something new to boost performance.
- The rest of them get LDT installed.
This is an administrative nightmare but one I will have to deal with till we upgrade all LDT licenses to C3D. If you have to deal with dispersed license servers like myself this is even a bigger deal. How many of which where, Hmmm..., What if...
Good Luck to all who are making the switch to Civil 3D. The good thing is that we're not alone!
Monday, May 21, 2007
Fix broken hatch patterns
This is a classic issue and they're many people who don't know about or seem to forget "SNAPBASE".
Issue: Your hatch is broken into segments. Below is an example of the Gravel pattern. The further your hatch objects are from 0,0 the worse it gets.
Solution:
1) Type "SNAPBASE"
2) Pick a point near your proposed hatch area.
3) If your hatch pattern exists all you have to do is type "HE" for "HatchEdit" and press OK. Double clicking a hatch object also opens the Edit Hatch dialog.
OR
3) Create a new hatch object.
IMPORTANT STEP!!! Reset snapbase back to defaults.
4) Type "SNAPBASE"
5) Type "0,0" (Return to Default)
Updated for AutoCAD 2008 on 12/16/08:
The above workaround doesn't always work.
So here's round 2:
- Create a hatch boundary polyline.
- Wblock, copy clip into a new blank drawing around 0,0,0.
- Hatch as usual.
- Wblock, copy clip into your original drawing around 0,0,0. Remember to include the hatch boundary in your selection. You'll need it to move your hatching into position.
- Finally move it into place.
If you have a faster work around please reply. I will copy your tip into the main post so people can get the answer and return to work.
Thursday, April 26, 2007
Quick select is not permitted in perspective view
I grew some grey hairs on this one. Consider this post as my forwarding of information from this AUGI forum post. Mike.Perry posted this fix on July 22, 2004. Scroll down to his last response for the fix.
This also fixed my problem where I couldn't select objects to edit. Also if I regen my drawing they would disappear. I was ready to block my line work into a fresh new drawing file.
I believe you may view this post as a guest. http://forums.augi.com/showthread.php?t=6039
If you're not a member of AUGI you should be. There's a wealth of info here. Here's the link: http://www.augi.com/join/application.asp
Snippet:
Command: dview
Select objects or <>: Press Enter
Enter option[CAmera/TArget/Distance/POints/PAn/Zoom/TWist/CLip/Hide/Off/Undo]: PO
Specify target point <17741.51,>: 0,0,0
Specify camera point <17741.51,>: 0,0,1
Enter option[CAmera/TArget/Distance/POints/PAn/Zoom/TWist/CLip/Hide/Off/Undo]: Press Enter to Exit
Thursday, February 01, 2007
Plot Stamp switch from Rtext with Diesel Code to Text with Fields
All of my Title Blocks contained a Plot Stamp using the Rtext object with diesel code. I switched and now use a Text object with Fields.
I was sifting through the vast Field object options and found a field that will only update after I plot. If you want this option it is in the PLOT category and called PLOTDATE in the field names list.
This behavior isn't like the Rtext where it updates after every Regen. I got a tip from my buddy's at CAD Masters on how to use my diesel code inside fields. This is in the OTHER category and called DIESEL EXPRESSION in the field names list. Eueka! Same flavor different smell.
As a CAD Manager you must upgrade your systems and processes as new releases offer better solutions. This move for me was my 1st step towards using fields in general. This post is a bit late, but hey, better late then never.
Wait a minute. Need some code? Here you go.Date: $(edtime,0,mon dd"," yyyy)
Time: $(edtime,0,h:mmam/pm)
Dwg Name: I used the DOCUMENT > FILENAME field.
See my response below to get diesel and autolisp syntax for File Name and Location.
Subscribe to:
Posts (Atom)