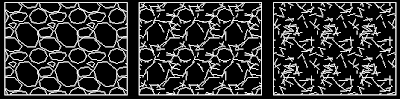
Issue: Your hatch is broken into segments. Below is an example of the Gravel pattern. The further your hatch objects are from 0,0 the worse it gets.
Solution:
1) Type "SNAPBASE"
2) Pick a point near your proposed hatch area.
3) If your hatch pattern exists all you have to do is type "HE" for "HatchEdit" and press OK. Double clicking a hatch object also opens the Edit Hatch dialog.
OR
3) Create a new hatch object.
IMPORTANT STEP!!! Reset snapbase back to defaults.
4) Type "SNAPBASE"
5) Type "0,0" (Return to Default)
Updated for AutoCAD 2008 on 12/16/08:
The above workaround doesn't always work.
So here's round 2:
- Create a hatch boundary polyline.
- Wblock, copy clip into a new blank drawing around 0,0,0.
- Hatch as usual.
- Wblock, copy clip into your original drawing around 0,0,0. Remember to include the hatch boundary in your selection. You'll need it to move your hatching into position.
- Finally move it into place.
If you have a faster work around please reply. I will copy your tip into the main post so people can get the answer and return to work.


